Stromboli photos
How to take good eruption photographs
Although it is generally quite easy to take decent pictures of the eruptions, there are ways to make them even better. I have been practicing for the last twenty years or so. Here are a few of my 'secrets'. The pictures linked to in this section are also accessible via the Photo archive (Summit craters and eruptions). You will also find captions to the pictures there.
Equipment: what NOT to take
Ash eruptions may look fairly spectacular during daytime. However, the incadescent lava is not bright enough to glow visibly before nightfall. Spectacular pictures of red-hot lava are only possible during dusk, night or dawn. Automatic 'quick snap' cameras cannot expose for many seconds or minutes. Therefore, they are not useful for eruption photography at night (you may, nevertheless, observe many tourists taking flash photographs of sunsets and eruptions...) Some expensively equipped electronic single lens reflex cameras consume a considerable amount of battery power during long exposure times. This is also not very useful, unless you can take enough spare batteries along.
Equipment: what is essential
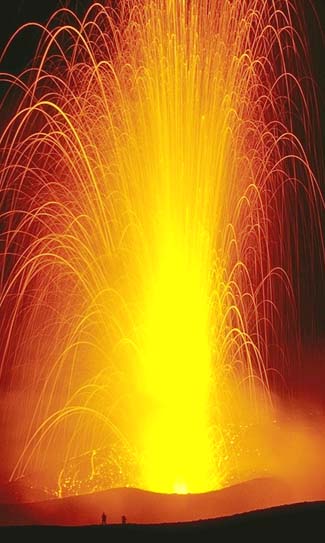
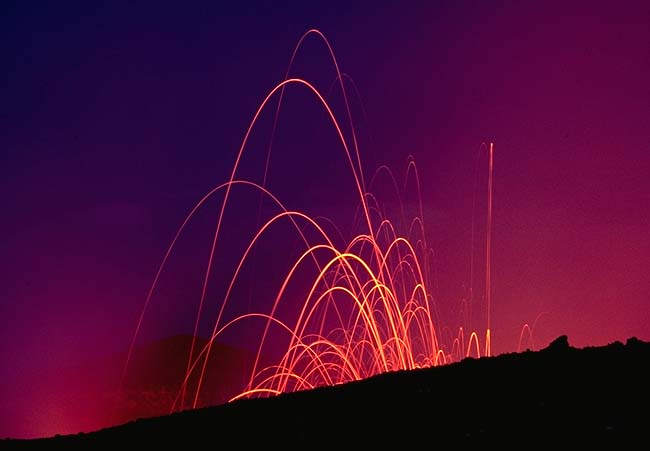
A simple camera capable of keeping its shutter open indefinitely ('B-setting') will do. It does not need to be single lens reflex. Standard lenses (about 50 millimetres focal length) give a very good image scale when you are on the summit (like in this example). Bigger eruptions completely fill the image format. Smaller eruptions can be made to fill the picture with a short telephoto lens.
The spatters are quite bright at night, so an f-stop of about f2 or f2.8 is quite sufficient, unless you plan to use extremely slow film (see below). In fact f1.8 or faster can lead to overexposed images.
You will take photos with several seconds exposure time. A tripod, therefore, is essential. However, I have managed to use a pile of rocks instead. In fact this is better than a flimsy, shaky tripod. However, it is tricky to aim the camera if it is close to the ground. Tripods can hardly be too heavy and too stable (not considering the trouble of carrying them up the mountain, though...). If your tripod is not very sturdy, the release of the shutter will make the camera vibrate ever so slightly, causing the trails of the flying bombs to become wavy (there is a trick to avoid this, though, see below).
In order to open your shutter for 10, 20 or more seconds, you need a cable release. Obviously you brought a flashlight for walking in the dark. You also need it to set your camera.
Equipment: what is useful
Usually you will aim at crater X, but then (after a very long wait) crater Y erupts. Often the eruption will be over by the time you have re-aimed your camera. Nowadays I avoid such frustrating experiences by using at least two cameras. There are gadgets which let you mount more than one on a single tripod (don't forget stability, though!).
Although it has never happened to me, I once saw someone's lens coating getting eaten away by acidic fumes on Stromboli. Since I don't want to risk this I use UV- or skylight filters to protect my lenses. This is a good idea also because there is a lot of abrasive dust around.
Handkerchiefs (don't lough!), plastic bags and rubber bands: I use them to protect cameras from falling ash, and - sometimes - even light rain.
A small spirit level is extremely handy to level the camera. I found it very easy to misjudge the horizontal at night (you don't usually see the horizon). What you then get is eruptions in which the material seems to fall back to Earth in very peculiar angles.
Film
As I mentioned before, the pyroclastics usually are astonishingly bright. All photos shown in the photo gallery were taken on Kodachrome 64 film. I tried faster films but got worse results. In particular the colour saturation was worse. There may, however, be a reason for fast films, if you want to catch the scenery around the craters even when there is no moon in the sky (see below). Take enough film! There are (fortunately) no shops on summit.
Getting ready
Personally, I like to set up the tripod and the cameras in daylight. I aim at the craters, level the camera and have a picnick before it gets dark. Sometimes I have to 'waste' an eruption by watching it through the viewfinder. This is to judge how high up the bombs fly and if the jet of erupted material really emerges where I thought it would. This is, quite often, not the apparent center of a crater.
On the summit I usually go towards the slope as far as safety allows so that other people (there may be lots of them!) don't walk into the picture or don't wave flashlights at my camera lens.
Some very dramatic pictures can be taken during dusk or dawn (they will not just show red lines, but some background as well). However, sometimes Stromboli does not oblige and refuses to erupt exactly when the illumination is best. Be ready, just in case!
Sitting behind one's camera in the cold of the night for hours on end is not everybody's cup of tea. I prefer to move around a bit. It is usually cold enough, even in summer. In order not to 'lose' a good eruption I usually aim at a crater, open the shutter and let the camera expose. If an eruption happens within the next half hour or so, I've caught it. If not, I re-start a new picture (exposing for too long may make the background too bright, even at night). This technique also saves you having to find the cable release after the eruption has begun. Also it avoids problems with shaky tripods, since you do not release the shutter when ejacta are flying through the field of view.
Exposing
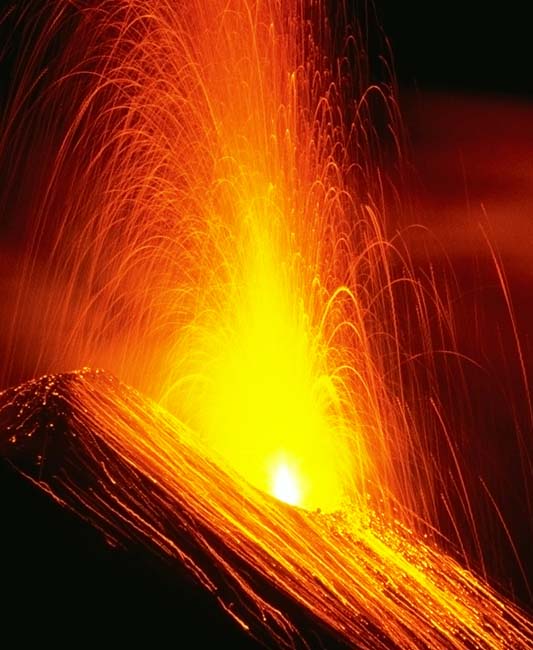
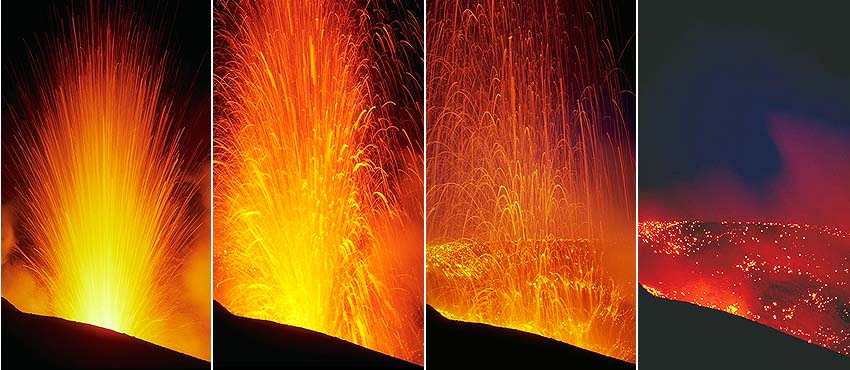
The easiest is to keep the shutter open right through an eruption (this may lead to overexposure on fast films, such as 200 ASA or more, when using fast lenses). If you position yourself on the ridge leading from the North towards the summit, at about 800 m.a.s.l., you can see material sliding down the Sciara del Fuoco after eruptions of crater 1. This will look particularly nice if the exposure is continued for some time after the eruption has finished. Here is an example. You can also take dramatic sequences by only exposing for one or two seconds at the beginning, during the climax and at the end of an eruption. For this series I used a 135 millimetre lens. The last picture was exposed for much longer than the others in order to catch the fading glow of the cowpat bombs.
Background scenery
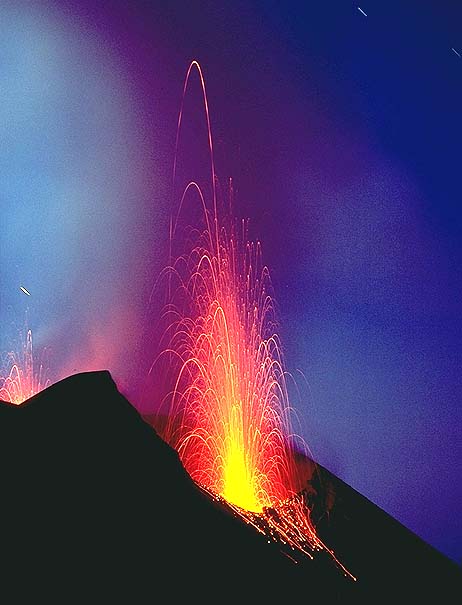
So you want to do more than the average tourist? Try this: 'After-expose' an eruption for perhaps half an hour (without moon) or 5 to 10 minutes (with the moon in the sky). This is assuming you work at about f2 with Kodachrome 64 or a comparable combination. You will then get the landscape in dark grey or blue hues as well as the eruption. This example was taken during a last quarter moon illuminating the scene from the left (long past midnight), and this one with no moon at all.
Things that will probably go wrong
(unless you watch out for them) Falling air temperatures and steaming fumaroles make an ideal setting for a lot of condensation. Unless the night is unusually warm and dry and perhaps if the wind is from the back, dew will form on the ground, the camera, it's lens and you. Don't forget the lens. I frequently check if it has fogged over and wipe it clean when necessary. When the dew is worst, I usually forget...
More often than not the wind direction is not ideal. Fumes and smoke will then drift from the craters towards your vantage point, resulting in poor visibility and coughing fits. A handkerchief in front of your mouth helps to reduce the stench surprisingly well. Maybe you can move to the left or to the right somewhat in order to avoid some of the volcanic exhalations.
During such adverse wind conditions ash thrown out by Stromboli will be showered upon you and your equipment. Later on focusing threads of camera lenses will make grating noises unless the camera was protected by pieces of cloth, plastic bags etc.
Things that - hopefully - will NOT happen
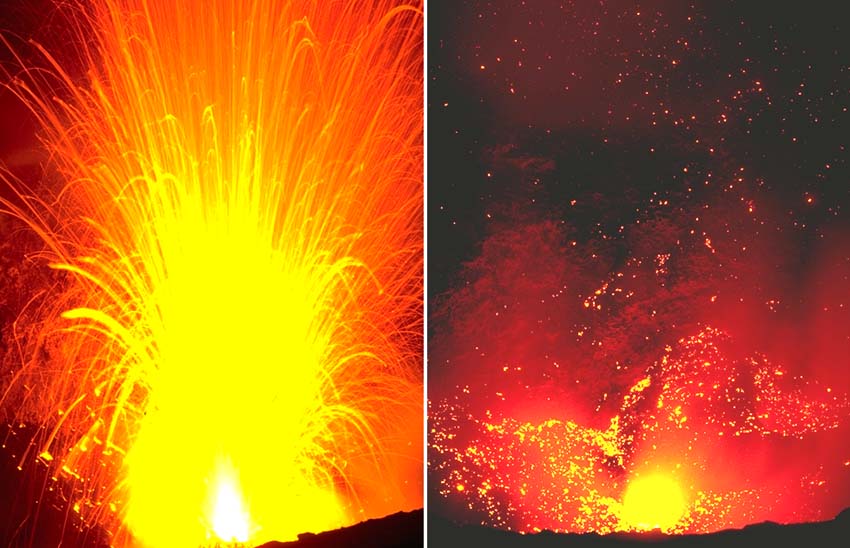
You are sitting on one of the best behaved volcanoes in the world. Nevertheless there may be surprises. Generally it is NOT a good idea to camp and sleep on the summit. Going close to the craters is VERY dangerous (like the people in the bottom part of this picture). The photos don't get any better. In fact the eruptions may exceed the angle of view of your camera lens.
Many years ago (when I was young and inexperienced) I tried it anyway. Later on I found out that the craters on Stromboli can vary both, their shooting angle and their range without prior warning. You can avoid the risk of going up close by (virtually) looking right into the craters here on STROMBOLI ON-LINE.